How do I modify the group schedule for our customer account in the MAXcore 2.0 portal?
Question
How do I modify the group schedule for our customer account in the MAXcore 2.0 portal?
Answer
To modify an already existing schedule at the group level, you can use the following steps:
- Log into the MAXcore 2.0 portal with the your admin credentials:
- After login, the admin will be presented with the MAXcore homepage, they will navigate Customer Group Management page by selecting Groups
 from the left navigation menu. Next select the group where the schedule is located.
 - This will take you to the Group Details section. Look for the tab labeled Schedules
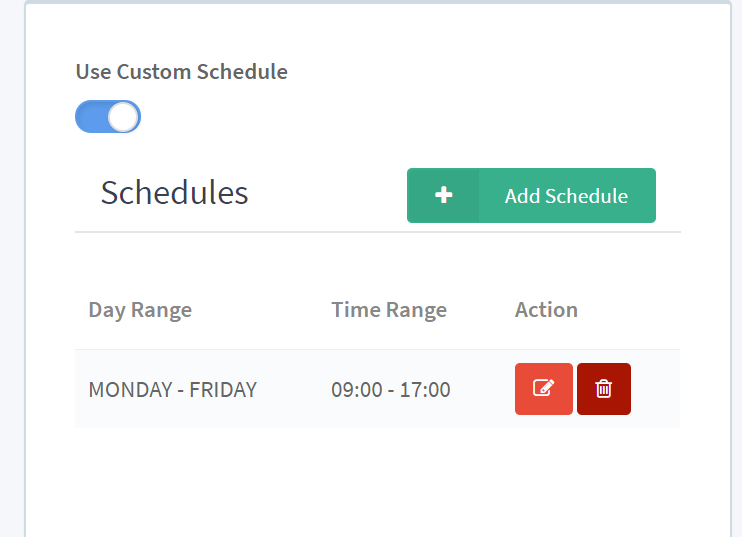
 You will select this tab to go to the Schedules section where you should see an already existing schedule which was previously created specifically for the group. Choose the edit icon
 next to the schedule you need to change. Now by choosing the edit icon you will be able to change the details of this existing schedule. You can change
- Start Day
- End Day
- Start Time
- End Time
-
- If you need to add a day that does not already exist on the current schedule like a weekend day like a Saturday/Sunday or a time outside of the current schedule. You can select
 and add the day or time needed if it does not already exist in the group schedule.
- If you need to modify the current schedule to a new updated schedule, you can select Add Schedule and create a new schedule for the group to follow; then once the new schedule is created, you are able to delete the old schedule by selecting the delete icon to the right of the old schedule

- A note about modifying or deleting schedules at the Group level, this schedule dictates the open and closed configurations for routing calls and could possibly affect hunt groups or auto attendants within the group that do not have a specific custom schedule.
- To add a schedule:
- Adding a schedule: Click green ADD button which will take you to the schedule details section so you can add a new schedule.. Under schedule details, you can select the start day, end day, start time, and end time. Once these fields are set, you will be able to save the schedule by clicking the CREATE.
- If you need to modify the current schedule to a new updated schedule, you can select Add Schedule and create a new schedule for the group to follow; then once the new schedule is created, you are able to delete the old schedule by selecting the delete icon to the right of the old schedule
- If you need to add a day that does not already exist on the current schedule like a weekend day like a Saturday/Sunday or a time outside of the current schedule. You can select